Here is another Paneer dish which I’ve been making very frequently these days for my kid’s lunch box. The first time I made this, it was an instant hit with my daughter and hubby dear who is not much of a paneer fan was also full of praises. It’s a real quickie and can be whipped up in less than 10 minutes if you have the rice cooked and ready. The addition of methi or fenugreek leaves lends a wonderful flavor and aroma to this dish. So let’s get straight to the recipe:
What you’ll need
1. Basmathi Rice – 1 cups
2. Paneer - cubed 150 gms
3. Methi/Fenugreek Leaves – 2 small bunches
4. Onion – 2 Medium
5. Tomato – 3 medium
6. Green Chilles – 2 or 3
7. Garlic – 1 or 2 cloves
8. Ginger – 1 small piece
9. Turmeric Powder - a pinch
10. Chilli Powder – 1 tsp
11. Garam Masala Powder – ½ tsp
12. Cumin Seeds – ½ tsp
13. Oil/ Ghee – 1 tbsp
Method
Cook basmathi rice in a pressure cooker with 2 cups of water for 2 whistles. Once pressure is released, remove rice into a big plate fluff it and let it cool.
Heat a Kadai with oil/ghee, add cumin seeds. Once it changes color, add in the sliced onions, grated ginger, chopped garlic and green chillies. Saute till the onions are fried well. Puree the tomatoes and add it at this stage. Add turmeric powder and chilli powder. Fry for 3 to 5 minutes or till the raw smell of tomatoes is gone and most of the moisture from the tomato is evaporated. Next add in the chopped fenugreek leaves and fry for about a minute or 2. Next add in the cubed paneer pieces and mix well. Now add the garam masala, cooked rice and salt to taste. Mix well on high flame till all the flavors blend well.
Delicious Methi Paneer Pulao is ready to be served. Serve it with a raita of your choice.
Note:
You could add Peas instead of Methi , that is also a good combination.
Linking this to Shobha's Cook it Healthy - Proteinicious and Healthy Lunch Box Ideas started by Kalyani and guest hosted by Jayashree
Wednesday, July 13, 2011
Tuesday, July 12, 2011
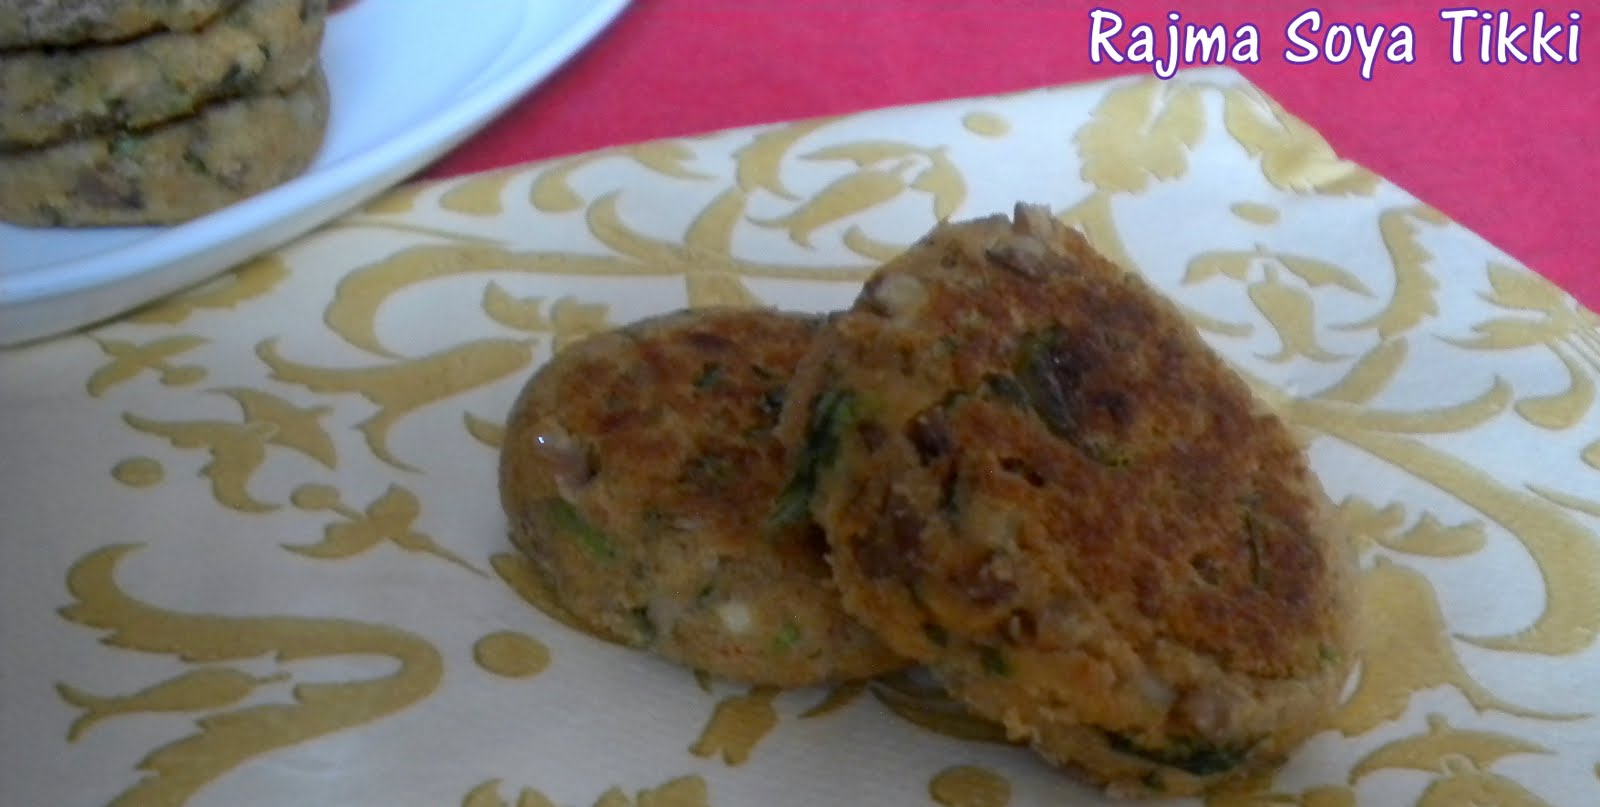
Rajma Soya Tikkis
The first day of this academic year, as usual I was waiting for my daughter to come back from school. By the time she freshened up and changed I was ready with her regular bowl of curd rice. But my daughter had totally different plans for me. My daughter wanted to have snacks or tiffin after she’s back from school. Though on that particular day she finished the bowl of rice with a grumpy face, but from next day onwards I had to make her something. So from then on, I’ve always been on the lookout for some healthy and nutritious snack items.
The other day, while I was surfing the channels I chanced upon this cookery show and saw this yummy but very healthy snack. Rajma and Soya as everybody knows are packed with proteins. And generally things like cutlets catch children’s fancy. So I decided to make this and not only did my daughter but all the others in the family liked it. So here is the recipe:
What you’ll need
1. Rajma – 1 cup, soaked overnight
2. Soya Chunks – ½ cup
3. Potato – 1 medium
4. Ginger – 1 inch piece
5. Green chillies – 2 or 3
6. Fennel Seeds – ½ tsp
7. Garam Masala Pwd – ½ tsp
8. Cumin Powder – ½ tsp
9. Lemon Juice – 1 tsp
10. Fresh Coriander leaves - a little
11. Salt to taste
12. Oil for pan frying
Method
Cook the rajma and potato in a pressure cooker until soft. Drain all the water from the rajma. Mash it well or pulse in a mixer for a minute. Soak the soya chunks in hot water for 10 minutes. Squeeze all the water from the chunks. Pulse these too in a mixer.
Now in a mixing bowl, add the mashed rajma, ground soya, mashed potatoes, finely chopped green chillies, grated ginger, fennel seeds, garma masala, cumin powder, lemon juice, chopped coriander leaves and salt to taste. Mix it well.
Pinch out lemon sized balls and shape them into tikkis. Heat a non stick tava, place the tikkis on it, 2 at a time drizzle oil on the sides. Flip and cook in medium flame till both sides turn brown.
Healthy and tasty tikkis are ready. Best served with green chutney else serve with tomato ketchup.
Linking this to Kid's Delight - Mini bites hosted by Champa started by Srivalli, and to Cook it Healthy - Protien icious event started by Shobha and to Aipi and Priya's Bookmarded Recipes.
Also linking these to Deepthi's Healthy Snacks Event
Also linking this to Radhika's Event Let's Cook - Break Time Snacks
The other day, while I was surfing the channels I chanced upon this cookery show and saw this yummy but very healthy snack. Rajma and Soya as everybody knows are packed with proteins. And generally things like cutlets catch children’s fancy. So I decided to make this and not only did my daughter but all the others in the family liked it. So here is the recipe:
What you’ll need
1. Rajma – 1 cup, soaked overnight
2. Soya Chunks – ½ cup
3. Potato – 1 medium
4. Ginger – 1 inch piece
5. Green chillies – 2 or 3
6. Fennel Seeds – ½ tsp
7. Garam Masala Pwd – ½ tsp
8. Cumin Powder – ½ tsp
9. Lemon Juice – 1 tsp
10. Fresh Coriander leaves - a little
11. Salt to taste
12. Oil for pan frying
Method
Cook the rajma and potato in a pressure cooker until soft. Drain all the water from the rajma. Mash it well or pulse in a mixer for a minute. Soak the soya chunks in hot water for 10 minutes. Squeeze all the water from the chunks. Pulse these too in a mixer.
Now in a mixing bowl, add the mashed rajma, ground soya, mashed potatoes, finely chopped green chillies, grated ginger, fennel seeds, garma masala, cumin powder, lemon juice, chopped coriander leaves and salt to taste. Mix it well.
Pinch out lemon sized balls and shape them into tikkis. Heat a non stick tava, place the tikkis on it, 2 at a time drizzle oil on the sides. Flip and cook in medium flame till both sides turn brown.
Healthy and tasty tikkis are ready. Best served with green chutney else serve with tomato ketchup.
Linking this to Kid's Delight - Mini bites hosted by Champa started by Srivalli, and to Cook it Healthy - Protien icious event started by Shobha and to Aipi and Priya's Bookmarded Recipes.
Also linking these to Deepthi's Healthy Snacks Event
Also linking this to Radhika's Event Let's Cook - Break Time Snacks
Friday, July 8, 2011
Moong Dal Parathas
I’m a great fan of stuffed parathas. I make them quite often with different fillings. Of these my daugther’s and my favorite are paneer parathas, aloo parathas and these moong dal parathas. Stuffed parathas make a wholesome lunch without the need to prepare a separate side dish. My lil one has it with some ketchup and I just have it as it is or with some pickle. Now you guys must be wondering what is that side dish doing in the photo! That was made especially for hubby dear, since he needs some side dish or the other with his plate of rotis or parathas. Ok so let’s get on with the recipe of these protein packed parathas:
Makes about 8 parathas
What you’ll need
For the dough
1. Wheat flour – 2 cups
2. Oil – 1 tblsp
3. Salt to taste
4. Water as required to knead the dough
For the stuffing
1. Split Moong Dal – 1 cup
2. Green Chillies – 2 to 3
3. Grated Ginger – 1 tsp
4. Cumin Seeds – ½ tsp
5. Oil – 1 or 2 tsps
6. Salt to taste
Method
For the dough, in a mixing bowl, take wheat flour add salt and oil and mix it well. Add water little by little and knead into soft and smooth dough. Keep covered.
Lightly roast the split moong dal till a nice aroma comes out. Wash and pressure cook it in just enough water. Make sure not to add too much water else the stuffing will become mushy. Cool, mash and keep aside.
Heat a Kadai, with about 2 tsps of oil. Add the cumin seeds and sauté for a minute. Next add in the finely chopped green chillies, grated ginger and stir. Add the mashed dal and salt to taste. Give everything a nice stir. The mixture will leave the sides and come together as a soft ball. Remove from flame and let it cool.
For making the parathas, pinch out a lemon sized ball from the dough, roll out into a small disc. Place a spoonful of filling in the middle and bring the edges together to completely cover the filling. The edges should overlap slightly to seal the masala. Gently flatten the filled ball. Dust with flour and roll out to a flat disc of about 5-6 inches.
Heat a tava (griddle). Roast the paratha on medium heat till done on both the sides. Grease the paratha with a little oil while cooking.
Delicious hot moong dal parathas are ready to eat with a raita and pickle of your choice.
Linking this to Cook it Healthy - Proteinicious Event started by Shobha
Makes about 8 parathas
What you’ll need
For the dough
1. Wheat flour – 2 cups
2. Oil – 1 tblsp
3. Salt to taste
4. Water as required to knead the dough
For the stuffing
1. Split Moong Dal – 1 cup
2. Green Chillies – 2 to 3
3. Grated Ginger – 1 tsp
4. Cumin Seeds – ½ tsp
5. Oil – 1 or 2 tsps
6. Salt to taste
Method
For the dough, in a mixing bowl, take wheat flour add salt and oil and mix it well. Add water little by little and knead into soft and smooth dough. Keep covered.
Lightly roast the split moong dal till a nice aroma comes out. Wash and pressure cook it in just enough water. Make sure not to add too much water else the stuffing will become mushy. Cool, mash and keep aside.
Heat a Kadai, with about 2 tsps of oil. Add the cumin seeds and sauté for a minute. Next add in the finely chopped green chillies, grated ginger and stir. Add the mashed dal and salt to taste. Give everything a nice stir. The mixture will leave the sides and come together as a soft ball. Remove from flame and let it cool.
For making the parathas, pinch out a lemon sized ball from the dough, roll out into a small disc. Place a spoonful of filling in the middle and bring the edges together to completely cover the filling. The edges should overlap slightly to seal the masala. Gently flatten the filled ball. Dust with flour and roll out to a flat disc of about 5-6 inches.
Heat a tava (griddle). Roast the paratha on medium heat till done on both the sides. Grease the paratha with a little oil while cooking.
Delicious hot moong dal parathas are ready to eat with a raita and pickle of your choice.
Linking this to Cook it Healthy - Proteinicious Event started by Shobha
Tuesday, July 5, 2011
Eggless Microwave Chocolate Cake
Friends, here is my first post on a cake. Though I like baking and love the baked goodies, I’ve not tried my hand on baking much. All I used to bake is the basic sponge cake and a few cookies here and there. Now that my OTG is not working (that’s been almost a year now!!!) I have all the more reason not to bake.
But ever since I saw this microwave cake in Apy’s Blog, I’ve been tempted to make it. The reasons are quite explicit. First the cake just looked too good. Second, does not require OTG and the recipe sounded very simple, no beating, folding, etc and last but not the least: did not require eggs. Though I was very skeptical about how it would turn out but the end result was awesome. I just loved the texture of the cake. It turned out quite soft and spongy. This is the third time I am making it and was fortunate enough to get some clicks before the cake reached my kid’s hands. So here is my version of the cake:
What you’ll need
1. All Purpose Flour/Maida – 1 cup
2. Cocoa Powder – ¼ cup
3. Sugar – ¾ cup
4. Refined Oil – ½ cup
5. Milk – 1 cup (at room temperature)
6. Baking Powder – ¾ tsp
7. Vanilla Essence – 1 tsp
Method
Sieve the maida, coco powder and baking powder 2 to 3 times. Make sure there are now lumps. Keep this aside. In a mixing bowl, add the sugar, oil and milk. Whisk it well until the sugar dissolves completely. Now to this add the vanilla essence and mix well. Next add the maida, coco powder and baking powder mixture little by little and keep whisking until there are no lumps. Grease a Microwave safe cake dish and pour the cake mixture into it. Microwave on high for 7 minutes. There will be some wet spots on the cake. Let the cake stand in the oven for another 20 minutes. It will get done. To invert the cake onto a plate, let the cake cool for another 10 minutes. The bottom of the cake dish should not be hot while inverting.
Notes:
Sieving the maida, cocoa and baking powder is important for proper blending of the dry ingredients and also it adds in air which produces lighter cakes.
Microwave it only for 6 or max 7 mins and let it stand. The wet spots on the cake will get done during the standing time. If you cook till the wet spots get done, then the cake will turn crumbly.
Linking this to the Event - Celebrate with Sweets - Cake hosted by Sonia Started by Niveditha
also to Anyone can Cook - Series 24
And also to Bookmarked Recipes
But ever since I saw this microwave cake in Apy’s Blog, I’ve been tempted to make it. The reasons are quite explicit. First the cake just looked too good. Second, does not require OTG and the recipe sounded very simple, no beating, folding, etc and last but not the least: did not require eggs. Though I was very skeptical about how it would turn out but the end result was awesome. I just loved the texture of the cake. It turned out quite soft and spongy. This is the third time I am making it and was fortunate enough to get some clicks before the cake reached my kid’s hands. So here is my version of the cake:
What you’ll need
1. All Purpose Flour/Maida – 1 cup
2. Cocoa Powder – ¼ cup
3. Sugar – ¾ cup
4. Refined Oil – ½ cup
5. Milk – 1 cup (at room temperature)
6. Baking Powder – ¾ tsp
7. Vanilla Essence – 1 tsp
Method
Sieve the maida, coco powder and baking powder 2 to 3 times. Make sure there are now lumps. Keep this aside. In a mixing bowl, add the sugar, oil and milk. Whisk it well until the sugar dissolves completely. Now to this add the vanilla essence and mix well. Next add the maida, coco powder and baking powder mixture little by little and keep whisking until there are no lumps. Grease a Microwave safe cake dish and pour the cake mixture into it. Microwave on high for 7 minutes. There will be some wet spots on the cake. Let the cake stand in the oven for another 20 minutes. It will get done. To invert the cake onto a plate, let the cake cool for another 10 minutes. The bottom of the cake dish should not be hot while inverting.
Notes:
Sieving the maida, cocoa and baking powder is important for proper blending of the dry ingredients and also it adds in air which produces lighter cakes.
Microwave it only for 6 or max 7 mins and let it stand. The wet spots on the cake will get done during the standing time. If you cook till the wet spots get done, then the cake will turn crumbly.
Linking this to the Event - Celebrate with Sweets - Cake hosted by Sonia Started by Niveditha
also to Anyone can Cook - Series 24
And also to Bookmarked Recipes
Sunday, July 3, 2011
Cheesy Corn Capsicum Sandwich
As I was going through my posts, I found that most of my posts revolved around my daughter, Samyukta. Today’s post also has to do with her. She is a bread a cheese person. Almost every day morning her breakfast is bread and cheese: either grilled or just plain. So I have to come up with different combinations with her favorite things to make it a little healthier.
So here is one such recipe, which not only she but I also like very much. These healthy sandwiches can be whipped up in very less time and serves as an excellent breakfast, snack break or after school snack option.
What you’ll need:
1. Brown or White Bread Slices - 8
2. Sweet Corn Niblets – ½ cup
3. Capsicum – 1 small
4. Onion – 1 small
5. Black Pepper Powder – ½ tsp
6. Cumin Seeds – ½ tsp
7. Salt to taste
8. Oil – 1tsp
9. Cheese Spread as required
Method
Pressure cook the sweet corn niblets. Wash and finely chop onions and capsicum.
Heat a Kadai with a tsp of oil, add the cumin seeds. After it changes color add the chopped onions and fry it they turn transparent. Next add the chopped capsicum and fry for another 2 to 3 minutes. Add salt and pepper to taste. Stir well and let it to cool.
To assemble the sandwich, trim the sides of the bread slices and apply cheese spread to one side of all the bread. Now take one bread slice, place a small quantity of the filling on top of the cheese spread and close it with another bread slice with the cheese side facing down.
Toast it either in a toaster or on a tava. Cut into desired shapes and serve it with tomato ketchup.
Linking this to Srivalli’s Sandwich Mela, and Radhika’s Let’s Cook – Break Time Sancks
So here is one such recipe, which not only she but I also like very much. These healthy sandwiches can be whipped up in very less time and serves as an excellent breakfast, snack break or after school snack option.
What you’ll need:
1. Brown or White Bread Slices - 8
2. Sweet Corn Niblets – ½ cup
3. Capsicum – 1 small
4. Onion – 1 small
5. Black Pepper Powder – ½ tsp
6. Cumin Seeds – ½ tsp
7. Salt to taste
8. Oil – 1tsp
9. Cheese Spread as required
Method
Pressure cook the sweet corn niblets. Wash and finely chop onions and capsicum.
Heat a Kadai with a tsp of oil, add the cumin seeds. After it changes color add the chopped onions and fry it they turn transparent. Next add the chopped capsicum and fry for another 2 to 3 minutes. Add salt and pepper to taste. Stir well and let it to cool.
To assemble the sandwich, trim the sides of the bread slices and apply cheese spread to one side of all the bread. Now take one bread slice, place a small quantity of the filling on top of the cheese spread and close it with another bread slice with the cheese side facing down.
Toast it either in a toaster or on a tava. Cut into desired shapes and serve it with tomato ketchup.
Linking this to Srivalli’s Sandwich Mela, and Radhika’s Let’s Cook – Break Time Sancks
Subscribe to:
Posts (Atom)