Pages

Thursday, October 16, 2014

Maida Burfi/Maida Cake - Easy Diwali Sweets


Here is my next sweet for this Diwali. This is really a very easy and simple sweet and get ready very quickly. There was a time a my mother used to prepare this sweet every year for Diwali. This was also one of the first sweets I learnt to prepare.  I like to prepare it with the Vanilla essence but you can add even pineapple essence. I have not tried any other flavours. You can add any food color of your choice. I prefer not to add food color. So do try this really easy yet delicious burfi this Diwali.


Yeild – 14 to 15 medium sized pieces

What you'll need
  1. Maida/All Purpose Flour – ¾ cup
  2. Sugar – 1 cup
  3. Ghee, melted  – ¼ cup
  4. Vanilla Essence – few drops

Method
  1. Grease a tray with ghee and set aside.
  2. In a Kadai, add the ghee, once ghee is hot, and maida and fry the maida on medium heat for 4 to 5 minutes or until the raw smell of the flour disappears. Take care not to burn the maida. Keep aside.
  3. Heat a non stick kadai, add the sugar with ¼ cup water and dissolve the sugar. Heat the sugar syrup until the syrup reaches one string consistency. To test consistency, take a drop of the syrup in between your thumb and index finger and gently bring the fingers apart, you should see a single thread of sugar syrup.
  4. Now, switch off the flame/heat add the essence to the syrup.
  5. Add the fried maida and keep stirring. Keep stirring continuously till the whole mixture comes together as a mass/ball, took me about 5 minutes.
  6. Transfer to a greased plate and flatten the top with a butter paper of with the greased bottom of a flat cup like davara.
  7. Let cool for couple of minutes and then mark the pieces with a  sharp knife.
  8. Cool and remove pieces and store in airtight container.

Notes:
  1. I added Vanila essence and did not add any color. But you can add any food color of your choice, like yellow color and also change the essence to pineapple or a flavour of your choice. But my personal favourite is Vanilla.
  2. Mix continuously till the mixture leaves the sides of the kadai and comes together as a mass/ball.


Tuesday, October 14, 2014

Thenkuzhal - Easy Diwali Snacks


Thenkuzhal is one of the easiest murukku varieties and is a must in our house during Diwali and Krishna Jayanthi. It is my kid's favorite too. Usually my mom and MIL prepare the rice flour at home, but I have used the store bought idiyappam flour and it turned out very well. 

What you'll need
  1. Rice Flour/Idiyappam Flour – 2 cup
  2. Urad Dal Flour – ¼ cup
  3. Cumin Seeds – 1 tsp
  4. Hing/Asafoetida – generous pinch
  5. Butter – ½ tbsp
  6. Salt to taste
  7. Oil to deep fry

Method
  1. In a wide bowl, take the rice flour, urad dal flour, cumin seeds, hing and salt mix well.  Also add the butter and mix well so that butter is incorporated in the flours.
  2. Now add water little by little and knead into a smooth, slightly loose dough.
  3. Heat a Kadai with oil, for deep frying.
  4. Get the murukku press ready with the plate with 3 plain holes. Place enough dough in the mururkku press.
  5. Squeeze in circles on the back of a ladle.
  6. When the oil is hot enough, test by squeezing a very small piece in the oil, if it floats up immediately then the oil is hot, reduce the flame to medium and slide the squeezed murukkus into the hot oil.
  7. Fry on medium heat till the bubbles are almost stopped.
  8. Drain on a tissue paper, cool and store in air tight container.

Notes:
  1. While squeezing the thenkuzhal, if you see they are getting cut, then the dough might be tight, add a little more water and make it slightly loose.
  2. Don't add more than the mentioned amount of urad dal flour and butter, that will make the murukku very soft.


Sunday, October 12, 2014

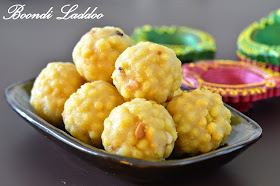
Boondi Laddoo - Easy Diwali Sweets


Time is flying. I know it sounds really cliched,  but it feels like yesterday when we were just done with the Navarathri celebrations and now its already time for Diwali. Days have been really very busy and I have not been able to give too much time to my blog. But with Diwali just around the corner, I wanted to post a couple of recipes for the occasion and here is the first one.
Boondi laddoos are a very popular sweet, be it any occasion.  It is fairly simple to make, not much of stirring and wondering whether you reached the correct stage to remove from heat like in the burfis. Though the method may sound daunting, it is quite easy.

Makes about 12 medium sized laddoos

What you'll need
  1. Gramflour/Kadala Maavu/Besan – 1 cup
  2. Water – ½ cup to ¾ cup
  3. Yellow Food Color – few drops (optional)
  4. Oil for deep frying
  5. Sugar –1 ½ cup
  6. Water – ¾ cup
  7. Ghee – 1 tsp
  8. Cashewnuts – about 15 broken into small pieces
  9. Raisins – few
  10. Whole Green Cardamom – 3 to 4
  11. Cloves – 3 to 4

Method
  1. Heat a small frying pan with ghee and fry the cashewnuts, raisins, cloves and cardamom. Keep aside.
  2. Sieve the gramflour and keep it in a wide mouthed vessel.
  3. Add water and make smooth batter of pouring consistency (dosa batter). (Refer my Kara Boondi post for detailed recipe and troubleshooting on how to make boondi)
  4. Add the food color and mix well.
  5. Pour the oil in a kadai and heat it for deep frying.
  6. In the meanwhile prepare the sugar syrup,
  7. Heat a Kadai, add sugar and add water just to immerse the sugar, about ¾ cup.
  8. Let the sugar dissolve completely and come to a boil. The sugar syrup should reach one string consistency.
  9. To test for the one string consistency, just take a little syrup between your index finger and thumb, you should see a single thread.
  10. Give it another boil and switch off the flame.
  11. To make the boondhis, place one of the perforated ladles, a little above the hot oil, pour a ladle of batter on the ladle, let the batter drop by itself, this gives perfectly round boondhis.
  12. Fry on medium heat, turning them once or twice in between.
  13. Fry until 3/4th done, don’t cook till very crisp, scoop out the boondhis and drain on tissue paper.
  14. Wipe the perforated ladle clean, so as no batter is sticking to it, then repeat the 5 to 7, with the remaining batter.
  15. Transfer the fried and drained boondhis to the sugar syrup. And mix well. U can transfer the boondhis to sugar syrup after each batch and give a good mix.
  16. After adding all the boondhis, add the fried nuts, raisins, cloves and cardamom and mix well.
  17. Let this syrup and boodhi become warm, then make laddoos by taking small amount of the boondis in your hand and form into balls. Set aside to set.
  18. Delicious laddoos are ready. These stay fresh for minimum 10 days at room temperature.


Note
  1. Don’t fry the boondis till very crisp then it becomes difficult to form the laddoos.
  2. If you feel that there is too much syrup after adding all the boondhis and finding it difficult to shape the laddoos, then just heat the whole thing for couple of minutes and cool and try again.
  3. You can also add diamond kalkandu, and very little pacha karpooram. I did not add as I didn't have it


Sunday, October 5, 2014

Vazhaithandu Molagootal


Molagootal is a typical Palakkad Iyer fare. It is a mild lentil and vegetable based dish. The most common vegetables used are Ash Gourd, Yam, Pumpkin and Plantain. It is also prepared using other vegetables like Cabbage, Spinach or other greens and Vazhathandu/Plantain Stem. This version made of vazhathandu/plantain stem is one of my favourites. Pair it with a Thogayl or Pachadi and rice and you have a simple, healthy and very delicious meal.


Serves 3 to 4
What you’ll need
  1. Vazhathandu/Plantain Stem – 1 medium sized, finely chopped
  2. Pasi Paruppu – 1/3 cup
  3. Scraped Coconut - ¾ cup
  4. Cumin Seeds/Jeera – 1 tsp
  5. Turmeric Powder – ¼ tsp
  6. Salt to taste

Roast
  1. Urad Dal – 1 tsp
  2. Dried Red Chilly – 1

Tempering
  1. Mustard Seeds – ½ tsp
  2. Curry Leaves - few
  3. Coconut Oil – 2 tsp

Method
  1. Finely chop the vazhathandu and put in a bowl of water with a spoon of buttermilk/curd until use. I had 3 cups of the chopped vegetable.
  2. Dry roast the pasi paruppu until a good aroma comes, need not change color. Cool.
  3. Pressure cook the dal along with the vazhathandu, turmeric powder and salt and 1 to 1.5 cup of water, for 2 to 3 whistles.
  4. In the meanwhile, heat a small frying pan with a tsp of oil and roast the urad dal and dried red chilly until the dal turn golden.
  5. Grind this along with the coconut and cumin seeds into a fine paste adding little water.
  6. After opening the cooker, add this ground coconut paste, mix well add water to adjust the consistency, about 1.5 cup of water, check for salt and bring to boil.
  7. Once it starts boiling remove from heat.
  8. Temper with mustard seeds and curry leaves.

Serve with plain rice and a thogayal or pachadi