Pages

Tuesday, January 21, 2014

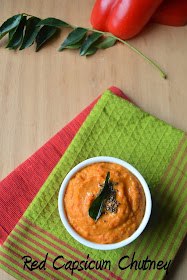
Red Capsicum/Bell Pepper Chutney - Easy Side Dish for Idly/Dosa


Capsicum is one of my favorite vegetables and I try to use it whenever possible. I love the distinct flavor it imparts to any dish it is added to. I love them in Sambar. Now the green Capsicum/Bell pepper is the one I had been using all these years. Though I used to buy the colored ones occasionally. They were not regulars in my cooking. 

In Amsterdam, we get a packet of 3 bell peppers, 1 each of green, yellow and red and they almost always find their way into my shopping cart.So I keep looking for recipes that make use of bell peppers. And that's how I tried this chutney once, I loved the flavor that came from the bell peppers. The red ones are slightly sweet.This chutney is now a regular in my kitchen. It makes a perfect pair with idly or dosa. You can even have them rotis as I sometimes :) Do give it a try in your kitchen and let me know how you like it.


What you’ll need
  1. Red Capsicum/Bell Pepper – 1
  2. Onion – 1, medium sized
  3. Tomato – 1 medium sized
  4. Bengal Gram Dal/Channa Dal – 1.5 tbsp
  5. Dried Red Chilly – 1 or 2
  6. Salt to taste
  7. Oil – 2 tsp

For tempering
  1. Oil – 1 tsp
  2. Mustard Seeds – ½ tsp
  3. Curry Leaves – few

Method
  1. Wash, halve, deseed and chop the red bell pepper.
  2. Roughly chop the onion and tomato.
  3. Heat a kadai with 2 tsp of oil. Add the channa dal and fry till they are almost golden brown.
  4. Add the red chillies and fry till they turn bright red.
  5. Transfer the channa dal and red chillies to a plate.
  6. Add the chopped onions into the same kadai, and fry till light brown.
  7. Next add the chopped tomatoes and fry till the tomatoes are mushy.
  8. Finally add the chopped red bell peppers and fry for couple of minutes.
  9. Remove from heat and allow to cool.
  10. Now, grind the channa dal and red chillies first, once they are coarsely ground, add the fried onions, tomatoes and bell peppers and grind to a smooth paste without adding any water.
  11. Add salt to taste.
  12. Heat a small frying pan, with a tsp of oil, add mustard seeds once they splutter, add the curry leaves. Remove from heat and pour over the chutney.

Delicious chutney is ready. Serve as an accompaniment with idly or dosa.


Note:
  1. The tomato I used was quite taart/sour, so just used one, if you are using the Roma tomatoes, increase to 2 medium sized.
  2. Adjust the spice level according to your taste, as there will be a slight sweet taste from the bell peppers.


Monday, January 20, 2014

Aval Dosai/Avil Dosai/Poha Dosa


Most of you, who read my blogs regularly would be knowing that we are not a breakfast family. We don't indulge in elaborate breakfast meals. It is usually oats, cereals or at the maximum bread. It is not that we don't prepare the usual breakfast items. We have it for dinner, and hence I find it really difficult to click pictures and post the same. And that is the reason why list of items in the tiffins category is very limited. I think it's high time I did something about that. And this recipe comes first in that list of additions to my Tiffin Menu.

A little something about this dosa. This is one a signature dish of one of my aunts. She usually serves it with a combination of ginger chutney. And it really tastes awesome. This dosa is really soft with lovely pores on top. It has a beautiful spongy texture. The best thing is it tastes good even when it is not hot. The most important part is the fermenting. the batter should ferment well, to get the kind of dosa I mentioned above. But if it is left out for too long also, then the batter will turn very sour. So, take the call on the batter, depending on the weather conditions at your place. Read the notes.


What you'll need 
  1. Raw Rice/Pachha Arisi – 3 cup
  2. Thick Aval/Poha/Flattened Rice Flakes – 1 heaped cup
  3. Vendayam/Fenugreek Seeds – 1 tsp
  4. Sour Buttermilk – as required, for soaking
  5. Salt to taste

Method
  1. Wash and rinse the rice well and then soak it in enough water with the fenugreek seeds for 3 to 4 hours.
  2. Wash the aval/rice flakes well and then soak it in sour buttermilk for atleast an hour. Let the level of the buttermilk be slightly above the riceflakes. Once soaked, the aval would have absorbed most of the buttermilk.
  3. Grind the rice and aval separately into a smooth paste adding water as and when necessary.
  4. Transfer to another container. Add salt to taste, mix well.
  5. Allow this to ferment for at 8 hours, if weather conditions are cold. In warmer places, you can grind the batter in the morning and make it at night.
  6. Heat a tava/non stick griddle, mix the batter very well with a ladle and then pour one big ladle of batter on the tava. No need to spread it, let it spread on itself. Pour half ladle more if you require slightly bigger dosa. Drizzle a little oil on the sides of the dosa, cover with a lid and cook on low flame till done. No need to flip the dosa.
  7. Repeat with the same with the remaining batter.

Serve hot, with chutney/sambar.


Notes:
  1. The batter should have fermented well, only then the dosa will come out nice and spongy with lot of holes at the top.
  2. Since we are using buttermilk to soak the riceflakes, if you live in a warm/hot country, the batter will ferment in 4 to 5 hours. So if not making the dosa on the same day, refrigerate the batter after it has fermented.
  3. If you are living in a cold place, the batter will take anywhere between 10 to 15 hours to ferment. So use your judgement. It takes almost 20 hrs for my batter to ferment.
  4. Don't stack the dosas, one on top of the other when hot, they will stick to each other.

Tuesday, January 14, 2014

Koffiebroodjes/Dutch Coffee Buns


For this month's Baking Partner's Challenge, I got an opportunity to suggest the recipes. I am thankful to Swathi to let me choose the recipes for this month. Ever since we moved to Amsterdam, I had been wanting to bake a couple of bakes that are popular in the Netherlands. I suggested two recipes, The Dutch Appeltaart, and the Koffiebroodjes. Both the recipes are from the site The Dutch Table, a blog with lot of local Dutch Recipes. 

Today I am posting one of them, the Koffiebroodjes or the Coffee Buns. No, they don't have any coffee flavor in them, its just that they are usually served along with a cup of coffee and hence the name. These are soft yeasted rolls, filled with pastry cream and raisins. They were easy to put together and were very delicious. These rolls were a hit with my family and I do see myself baking them often in the future.

I have pretty much followed the recipe, except for making a few changes to keep it eggfree. 


Recipe Source: The Dutch Table

What you'll need
  1. APF/Maida – 3 cup
  2. Instant Yeast – 7gm/1 pkt
  3. Milk – 1 ¼ cup (lukewarm)
  4. Butter – 3 tbsp
  5. Sugar – 4 tbsp
  6. Vanilla – 1 tsp
  7. Salt – 1 tsp
  8. Raisins – 1/3 cup

For the cream
  1. 1 pkt French Vanilla Pudding
  2. 1/3 cup of sour cream

For the glaze
  1. Apricot Jam – 2 tbsp ( I used Strawberry Jam)
  2. Warm Water – 1 tbsp


Method
  1. Soak the raisins in warm water and set aside for 15 to 20 minutes. Then drain.
  2. In a wide bowl, add the flour, salt, sugar and yeast.
  3. Mix well with hand.
  4. Now add the butter and the vanilla. Mix well again.
  5. Now add the milk little at a time and knead into a smooth dough.
  6. Cover and proof until doubled in size. It took me about 40 minutes. (may take upto an hour)
  7. In the meantime, Mix the pudding with half the required amount of liquid. Stir in the sour cream.
  8. Once the dough has proofed,
  9. Punch the dough and knead again for few minutes.
  10. Divide the dough into 3 portions.
  11. On a lightly floured surface, roll out the dough into a squarish shape, 12x12 inches approximate.
  12. Spread the vanilla pudding, leaving an inch on all sides.
  13. Sprinkle the soaked raisins over the pudding.
  14. Now roll the dough to form a cylindrical shape.
  15. Place the seam down and cut the roll into equal slices of about an inch or inch and half.
  16. Place the slices on a lined baking Sheet.
  17. Cover and proof for another 20 to 30 minutes.
  18. Pre heat the oven to 350 F.
  19. Brush the rolls with butter and bake them until golden brown, around 25 minutes.
  20. For the glaze, Mix the jam with warm water and brush the rolls after taking them out of the oven.
  21. Brush them again, when they’ve slightly cooled.

Serve warm with a cup of coffee.


Notes:
For the pastry cream,
I used my regular custard recipe, just reduced the amount of milk to get a thicker and spreadable consistency. Feel free to use any pastry cream recipe.

Sunday, January 12, 2014

Ulundu Vadai/Medhu Vadai


Ulundu Vadai or Medhu Vadai is one of the most popular South Indian snack. Like in any other South Indian household, these vadais are our family favourite too.
Now, though I love these vadas, it was not until very recently that I started making them on my own. And the credit of teaching me how to make them goes to my MIL. Now, making these vadas, though may seem very easy but I must tell they are tricky. It does take some practice and patience to get the perfectly shaped, crispy and fluffy vadas.


The consistency of the batter is the key to getting the perfect vadas. I should also tell you that, the vadas made from the batter ground in the wet grinder turn out to be much better than the ones made from the batter ground in a mixie. But what do you do, when you don’t have a grinder?
I don’t have a grinder now, and I have been grinding the batter for these vadas in a mixie for some time now. The first time I ground the batter in mixie I was really disappointed with the outcome of the vadas. Though I got perfectly shaped vadas, but they were way too hard. But after a couple of more trials, I got the hang of it and I have tried to write down all the points and tips that I follow to get crispy yet soft vadas.


What you’ll need
  1. Whole skinned Urad Dal – 1 cup
  2. Green Chillies – 1 or 2, finely chopped
  3. Ginger – a small piece, peeled and grated
  4. Curry Leaves – few, finely chopped
  5. Coriander Leaves – 2 tbsp, finely chopped
  6. Salt to taste
  7. Oil to deep fry

Method
  1. Wash and soak the urad dal in water for 2 hours (if grinding in mixie, if using wet grinder, then soaking for 30 to 45 mins is enough)
  2. Drain the water completely.
  3. Now, add the dal to the bigger mixie jar and grind without adding any water, once the dal is crushed, add water little by little and grind to a smooth batter. Make sure not to add too much water as it will become difficult to shape the vadas also, the vadas will drink too much oil.
  4. Transfer the batter to a bowl, now, with your hands mix the batter very well in circular motion. Do this for couple of minutes. This helps in making the batter fluffier and lighter. (This step is not required if you grind in wet grinder) I got this tip from Vah re vah.com
  5. Add the other ingredients and salt, mix well.
  6. Heat enough oil in a Kadai, drop a small amount of batter into the oil, if it goes down and comes up immediately then the oil temperature is right.
  7. To shape the vadas, take a bowl of water, dip your hand in the water, take a small ball of the dough with the wet hand, and make a ball, now insert you thumb finger in the middle of the ball to make a hole and gently slide the vada into the hot oil. Be careful while sliding into the oil.
  8. Repeat the same with the remaining dough. Fry the vadas till golden, filp and cook on both sides.
  9. Fry in batches of 3 or 4 or depending on the size of your kadai add more or less.


Notes:
  1. To get crispy yet soft and fluffy vadas, consistency of batter is very important, if you add very less water while grinding and the dough is very tight, then though you will get perfectly shaped vadas, but they will be very hard. And if you add too much of water, then it will be very difficult to shape the vadas and they will drink too much oil.
  2. How much water is the right amount is difficult to say, as much depends on the quality of urad dal. Try to use a good quality urad dal.
  3. If you feel the dough is just a little watery, try adding a tsp of rice flour.
  4. You could also soak a tsp of raw rice along with the urad dal to get crispy vadas.
  5. Refrigerating the dough for sometime also helps in getting shaped vadas.
  6. Add salt and onions (if using) just before making the vadas.
  7. The oil should not be smoking hot, else the vadas will turn black on the outside and not be cooked inside.


Tuesday, January 7, 2014

Hokkaido Milk Bread (Tangzhong Method)


This month, for the International Food Challenge, Shazia from Cutchi Kitchen chose recipes from the Hokkaido region. The Hokkaido Milk Bread makes use of the Tangzhong method. Tangzhong, or water roux, is a Japanese technique that was popularized in Asian countries by a Chinese cook book author Yvonne Chen in a book called the 65°C Bread Doctor

I have already a posted the recipe for a stuffed bun using the Tangzhong method, but it has been my long time desire to bake a loaf of bread at home from scratch. And finally I was able to do that with much satisfation. The bread turned out to be super soft with wonderful porous texture. It was a pleasure to see my kids enjoy the home made bread slices.


Recipe Source: Cookingandme

What you'll need
For Tangzhong 
  1. All Purpose Flour – 1/3 cup
  2. Water – ½ cup
  3. Milk – ½ cup


For the dough
  1. All Purpose Flour – 2 ½ cup
  2. Instant Yeast – 7gm
  3. Butter – 25 gm
  4. Sugar – 3 tbsp
  5. Salt – 1 tsp
  6. Milk Powder – 2 tbsp
  7. Milk – ½ cup
  8. Cream – 1/8 cup
  9. Tangzhong – (half of the above prepared tangzhong)


Method
To prepare the Tangzhong
  1. In a heavy bottom vessel, add the flour, water and milk and whisk everything well, without any lumps.
  2. Place this on heat and keep stirring on medium heat, after a while, the mixture will start thickening.
  3. Keep stirring till the mixture thickens well or till the spatula leaves a trail every time you move it through the mixture.
  4. Remove from heat and allow to cool.


To prepare the dough
  1. Take half of the prepared tangzhong, add the milk and cream and whisk well to form a smooth mixture.
  2. In another wide bowl, add the flour, sugar, salt, milk powder, and yeast. Mix well.
  3. Now add the tangzhong, milk, cream mixture to the flour and start kneading.
  4. I used my hand mixer, knead till everything comes together.
  5. Now add the butter and start kneading.
  6. Knead till you get smooth elastic dough. It takes about 10 – 15 minutes of kneading. When stretched it will be elastic and it will break with a circle in the middle
  7. Transfer this dough into a greased bowl, cover with a cling film and keep in a warm place, till the dough becomes double in size.
  8. Once the dough has risen, transfer the dough to a clean working surface, punch down and knead for 4 to 5 minutes.
  9. Divide the dough into 3 equal parts.
  10. On a lightly floured surface, place one of the parts of the dough, roll into a oval shape of 1/8 inch thickness.
  11. Bring the short end of the oval to the center. Now bring the other end to the center and drop it over the first fold overlapping it and press gently together. Flip it so that the pressed side is facing downwards.
  12.  Once again with the rolling pin gently roll to elongate it even more. Flip, so that once again the pressed side is facing up.
  13. Now roll the dough and place in greased bread loaf pan.
  14. Repeat the same with remaining 2 parts of dough.
  15. Cover the loaf pan with cling film and allow it to rise to double its volume. (about 45 mins to 1 hour)
  16. Brush the top with milk carefully.
  17. Pre heat the oven to 180 C.
  18. Bake for 25 to 30 minutes. Mine was done in 25 minutes.
  19. Cool slightly and invert the bread on a wire rack. Allow to cool completely before slicing.


Sunday, January 5, 2014

Thengai Sadam/Coconut Rice


Variety rice are always a welcome change from the regular Kootans/Kuzhambus. And they are life saviour on busy week days. Moreover, kids have a special affinity to these kind of rice varieties and hence it finds its way into the kids lunch boxes very often.

Growing up, I don't remember my mother or grandmother preparing the rice varieites too often. They were restricted to special days like Kanu Pongal - the day after Pongal or on the day of Aadi Perukku. Apart from these days, we would have either lemon rice or puliyumchadam packed for our train journeys.

All said and done, they are hasslefree to prepare and pack and are definitely a treat to the taste buds. The coconut rice is one such and is a breeze to prepare if you have some scraped coconut at hand. This is one of my personal favorites. I just love the heady aroma of the coconut and the coconut oil.


What you'll need
  1. Cooked Rice – 3 cup
  2. Fresh Scraped Coconut – 1.5 cup, tightly packed
  3. Green Chilly – 1 or 2 (adjust according to taste)
  4. Dried Red Chilly – 1 (adjust according to taste)
  5. Mustard Seeds – 1 tsp
  6. Channa Dal – 2 tsp
  7. Urad Dal – 2 tsp
  8. Peanuts - handful
  9. Curry Leaves – few
  10. Coconut Oil – 2 tbsp
  11. Salt to taste

Method
  1. Heat a Kadai with oil, add the mustard seeds, and once it splutters add the urad dal, channa dal, peanuts and dried red chilly.  Fry till the dals turns golden and the peanuts are fried
  2. Add the green chilliy and curry leaves and then add the scraped coconut and sauté for few minutes on low heat, until the coconut turns light brown.
  3. Now add the cooked rice and salt to taste and stir gently taking care not to mash the rice.
  4. Serve warm with some papads.